Useful faux fur sewing tips start with the backing, nap, and pile before any machine setting is changed. Long pile is easier to preserve when pieces are mapped deliberately, marked from the backing side, and cut without closing the blades through more visible fiber than necessary. Loose fibers and trapped pile should be controlled before and after stitching while the machine is safely stopped. This article covers synthetic faux fur on a fabric backing, not real fur, specialist fur equipment, or full garment construction.
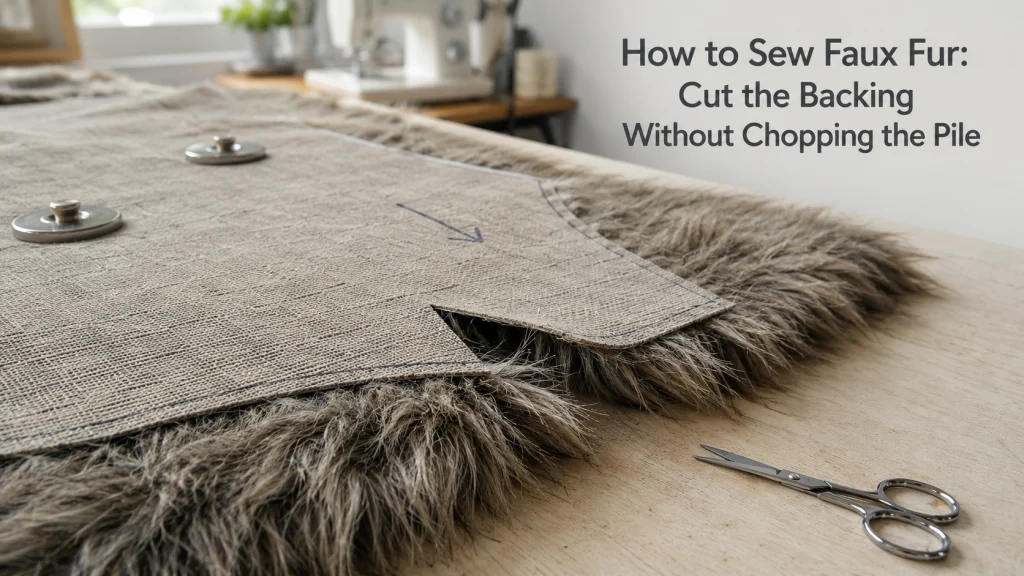
Cut the Backing, Not the Visible Pile
If you are learning how to sew faux fur, first separate the structural backing from the fibers standing above it. Long pile can make a piece look much thicker than the backing that actually defines the pattern edge. Cutting straight through the whole loft can shorten fibers along that edge and leave a blunt visible strip. Working from the backing side gives you a clearer line and a better chance to preserve the original pile length.
| Layer | What matters |
|---|---|
| Backing | Defines the pattern shape and seam allowance. |
| Long pile | Can be clipped unnecessarily if it sits in the cutting path. |
Test the method on a scrap before cutting a project piece. With scissors, use controlled cuts close to the backing on a supported surface instead of closing the blades through the full fluffy thickness. Check the right side after the test to see whether the edge still carries full-length fibers naturally. If the edge looks visibly chopped, change the cutting approach before repeating it across every piece.
Identify Backing Type, Pile Length, and Nap Direction
Turn the material over and inspect the backing before judging it only by the surface. Note whether the backing feels stable, stretchy, loosely knitted, or easy to distort, because those conditions affect marking and layer control. Then stroke the right side in opposite directions to find the way the fibers settle most naturally. That direction is the nap, and inconsistent nap can be obvious once related pieces are placed beside each other.
- Mark the nap direction on the backing.
- Note whether the backing stretches noticeably.
- Keep one labeled scrap for machine testing.
- Check whether pile length changes across the fabric.
Pile length is a separate variable from backing behavior. A short plush may create little edge overhang, while a long pile can hide the backing and produce much more loose fiber during cutting. Neither observation proves which needle, foot, or machine setting is correct. Record backing, pile length, and nap separately so later choices are based on the real material instead of its appearance alone, especially when two similar-looking furs use different support fabrics.
Keep Mirrored Pieces and Visible Nap Oriented Deliberately
Mirrored pieces can be cut to the correct shape and still be wrong if their pile runs in opposite directions. Long faux fur can reflect light and lie differently when one piece is reversed, even though both outlines match. A single-layer layout makes the relationship easier to inspect because each piece can be traced independently. Flip the pattern shape for the mirrored piece while keeping the intended nap direction consistent.
| Layout check | Decision |
|---|---|
| Nap arrow | Keep related pieces running in the intended visible direction. |
| Mirrored shape | Flip the pattern piece, not the planned nap. |
| Single layer | Use it when folding would hide direction or distort tracing. |
Do not assume the fold, selvage, or package orientation tells you the correct nap. Run your hand over the actual material and mark that direction before tracing. Place paired outlines side by side and compare their arrows before either one is cut. That check is slower than cutting through a folded pair, but it avoids discovering a reversed panel after the visible surface is assembled and the mismatch is much harder to correct.
Mark and Cut From the Backing Side Where the Material Permits
The backing side is usually easier to mark accurately because the pile cannot move under the marking tool. Test the chosen marker on a scrap first, since backings differ in color, texture, stretch, and how strongly they hold a mark. Trace the shape while the material is fully supported instead of letting the fabric weight pull the backing out of position. Keep the nap arrow visible on every traced piece so orientation remains clear after cutting.
When sewing faux fur in a single layer, cut one outline at a time and keep the pile away from the next section of the line. Use shallow, controlled cuts through the backing instead of forcing the tool through a dense bunch of fibers. Pause at curves or corners if the backing starts to stretch or the pile falls back under the blades. Accuracy in the backing matters more than speed because the backing, not the fluffy edge, defines the finished pattern shape.
Minimize Chopped Pile at Cut Edges
A visibly chopped edge usually means too much pile entered the cutting path with the backing. Before each cut, sweep or part long fibers away from the line so the tool meets less loft. After separating the backing, ease the pieces apart instead of pulling hard because long fibers may remain interlocked across the edge. Expect some shedding, but do not treat heavy clipping as unavoidable if a backing-side test shows a cleaner result is possible.
Check the right side of the test edge before moving on. Full-length fibers should still be able to fall naturally over the boundary instead of ending in a short straight band. If the edge looks barbered, refine the cutting angle or the way the pile is cleared. Preserving those fibers now gives the finished seam more natural coverage later, especially where the seam line remains visible when the pile is brushed into place.
Control Loose Fibers Before the Material Reaches the Machine
Loose fibers are normal during faux fur cutting, but they are easier to manage at the cutting table than around the needle plate. Move each finished piece away from the active layout and remove detached fibers from the edge with a gentle cleanup method. Put scraps directly into a container instead of stacking them beside the machine. A lint roller or vacuum can help with the surrounding surface, but cleanup should happen with the machine stopped and away from moving parts.
| What you see | Next step |
|---|---|
| Loose cut fibers | Contain debris before sewing. |
| Normal feed on the test stack | Continue material testing. |
| Repeated deflection or hard resistance | Stop and move to troubleshooting. |
Keep normal shedding separate from a machine fault. Loose pile on the table is a material-handling issue, while a stack that will not advance normally needs a different diagnostic path. The broader article on sewing with different fabrics helps separate material behavior from machine problems. Do not open internal machine areas or remove covers unless the exact manual identifies that work as owner-serviceable for the specific model.
Verify the Needle and Any Specialty Foot Before Sewing
Faux fur does not justify guessing at a needle or presser foot simply because the surface looks thick. The backing may be knitted, woven, stretchy, firm, or dense, while the machine still has its own needle system and attachment interface. Start with the exact machine manual and compatible accessory information, then match those limits to the backing and layer stack you plan to sew. Generic labels such as universal, stretch, walking, or even-feed do not prove fit by themselves.
If you consider a specialty foot because layers shift, verify the exact fit rather than judging by a seller image or similar shape. Choose a needle only from options supported for the machine, then test it on scrap from the real faux fur. If you are still learning to use a sewing machine correctly, keep accessory compatibility separate from fabric technique. One verified combination that works on the test stack is more useful than a generic recommendation presented as universal.
Keep Pile Clear of the Stitch Path Without Forcing It Near Moving Parts
Long pile can fold into the seam allowance before the needle reaches it. With the machine stopped, smooth or sweep the fibers away from the planned stitch path and hold the layers in their intended position. Check the edge before lowering the presser foot to make sure a thick ridge of fur is not trapped between the backings. This preparation reduces trapped pile without introducing a comb, scissors, or pointed tool beside a moving needle.
During sewing, guide the fabric without pulling it from behind. If the pile creeps back into the seam, stop the machine and reposition the fibers before continuing. Never try to rake the pile away while the needle is moving, even on a short seam. A clean visible surface is useful, but safe material handling comes first, and no finishing improvement justifies placing a tool beside an active needle.
Test the Actual Layer Stack, Not a Single Scrap
A one-layer scrap cannot represent a seam that joins two faux fur layers or crosses another bulky section. Build a test sample with the same number of layers, nap direction, and seam preparation planned for the project. Use the verified needle and presser-foot setup for the exact machine rather than copying an arbitrary setting from another model. Watch whether the stack advances evenly, the backing distorts, or the needle shows repeated deflection or unusual resistance.
| Test condition | What to observe |
|---|---|
| Actual layer count | Normal feed and controlled shifting. |
| Real nap direction | Pile stays out of the stitch path. |
| Bulky intersection | No repeated deflection or hard resistance. |
| Finished sample | Backing remains aligned and pile can settle naturally. |
The test should answer one specific question at a time. Two layers may feed normally while a crossing seam behaves differently, so test the difficult intersection rather than only the easiest part. Change one factor at a time if the sample needs refinement. Sewing with faux fur becomes much easier to interpret when the test reproduces the real seam, including its bulk and direction, instead of an unrelated scrap.
Release Trapped Pile Only With the Machine Stopped
Some fibers may still be caught in the seam after careful preparation, especially with long pile. Stop the machine and move the sewn area away from the needle before trying to free them. Use gentle material handling to lift trapped fibers back toward the right side without pulling hard on the backing or stitches. Work on a short section at a time so you can see whether the pile settles naturally before doing more.
If a fiber resists, leave it rather than using enough force to distort the seam. Long pile often covers more of the seam after it relaxes in its intended nap direction. The seam does not need aggressive picking to look acceptable. This is another reason the earlier cutting step matters, because full-length fibers can settle across the seam more naturally than fibers clipped short at the edge.
After the seam is complete, move the sewn piece fully away from the needle area before refining the surface. Use your fingers to smooth the pile in its natural nap direction, or pass a clean comb lightly through the right-side fibers if the material responds well on a scrap test. The goal is to let full-length fibers settle back over the seam, not to tug at stitches or force resistant fibers free. This final surface pass can restore a more continuous pile appearance without changing the seam construction itself.
Keep Coat, Costume, and Edge Construction Separate From Material Handling
This workflow covers preparing and normally sewing faux fur as a material. It does not prescribe how to build a coat, line a costume, draft a hood, finish a hem, bind an edge, or choose a specialized seam for a shaped garment. Those decisions depend on the pattern, seam allowance, lining, bulk, opening method, and other materials joined to the fur. Mixing them into a material article would hide the simpler question of how to preserve and control long pile.
Use these steps to make the faux fur pieces accurate, consistently oriented, and manageable at the machine. Then follow the project-specific construction instructions for the actual garment or object. If a pattern calls for trimming, grading, lining, turning, or another edge treatment, evaluate that instruction within the real layer stack. A collar, lined panel, and small decorative insert may use the same faux fur but still need different construction decisions.
Route Ordinary Lofted Fleece and Short-Pile Velvet Differently
Faux fur, fleece, and velvet can all be soft or bulky, but they do not create the same sewing problem. Fleece is more often governed by loft, stretch, feed behavior, and lint than by preserving long fibers at a distinct backing edge. Velvet has directional nap and can show shifting or surface marks, yet its shorter pile changes both cutting and seam handling. Stay with this workflow when long pile, backing-side cutting, shedding, and trapped fibers are the dominant issues.
| Dominant behavior | Better starting point |
|---|---|
| Long pile over a distinct backing | Faux fur handling. |
| Loft or stretch without long pile | Fleece handling. |
| Short directional pile and surface marking | Velvet handling. |
Use the tips for sewing fleece when loft and stretch control the setup. Use the article on sewing velvet with directional nap when short pile and surface behavior matter more. Choosing the correct material route prevents one fuzzy-fabric recipe from being stretched across fabrics that behave differently. The visible softness may overlap, but the preparation sequence should follow the material behavior that actually controls the seam.
Stop If the Machine Cannot Feed the Stack Normally
Normal faux fur handling can involve bulk and loose fibers, but it should not explain away a machine that cannot advance the tested stack. Stop if the fabric stalls, the needle repeatedly deflects, the handwheel feels abnormally resistant, or the motor sounds strained. Recheck the prepared stack, verified needle and foot setup, presser-foot state, and model-specific instructions before sewing again. A difficult material and a machine fault can exist at the same time, so the word fur is not a diagnosis.
Do not pull the project through, increase force, or change tension at random just to finish the seam. If ordinary owner checks do not restore normal feeding, move to problem-specific troubleshooting or qualified service. A successful test seam should feel repeatable rather than barely possible. These material-handling steps only make sense while the machine is operating normally within the limits described by its model-specific instructions.
Final Thoughts: Preserve the Pile Before Refining the Seam
The cleanest faux fur workflow begins with material identification rather than a machine adjustment. Map the nap, trace from the backing, cut the structural layer with minimal unnecessary pile clipping, and remove loose fibers before sewing. Verify the needle and any accessory for the exact machine, then control the pile before the presser foot comes down. Test the same layer stack the real seam will use so feed behavior is based on evidence from the project.
If the fabric behaves more like ordinary fleece, move to the fleece workflow instead of carrying long-pile precautions into a material that does not need them. If short directional pile and surface marking are the stronger issues, use the velvet workflow. When long faux fur is the correct route, preserve the material before trying to refine settings or add specialized hardware. Backing control first, verified machine setup second, and seam refinement after the test sample proves the combination is workable.
Frequently Asked Questions
Most beginner questions about faux fur return to the same decisions: which side to mark, which direction the pile should run, how to keep fibers out of the seam, and when to stop blaming the material for a feed problem. Each answer depends on pile length, backing behavior, project orientation, and the exact machine setup. Test these decisions on scrap before committing the full piece. That approach is more reliable than assuming one tool, stitch, or setting applies to every faux fur.
The answers below stay within normal owner-level material handling. They do not cover real fur, internal machine repair, or project-specific coat and costume construction. Any needle, foot, adapter, or other machine-interface part still needs exact-model compatibility verification. If the machine shows hard resistance, repeated needle problems, or abnormal strain, stop and move to troubleshooting instead of forcing the seam.
✂️ Should I cut faux fur from the back?
For long-pile faux fur with a fabric backing, wrong-side marking usually makes the actual pattern edge easier to see. Cut close to the backing so fewer long fibers enter the blades. Test the method on scrap because backing density and stretch vary.
🧭 How do I know which way the faux fur nap runs?
Stroke the pile in opposite directions and note the direction in which it settles most naturally. Mark that direction on the backing before tracing pieces. Keep related pieces oriented consistently unless the project deliberately calls for another effect.
🧵 Why does faux fur get trapped in the seam?
Long fibers can fold into the seam allowance and become caught between the layers. Sweep them away from the stitch path before sewing, then release remaining trapped pile only with the machine stopped. Keep sharp or pointed tools away from a moving needle.
⚙️ Do I need a special sewing-machine foot for faux fur?
Not automatically. A specialty foot may help some shifting problems, but fit and usefulness depend on the exact machine, interface, backing, and layer stack. Verify compatibility and test the real material before deciding it is necessary.
🪡 What should I do if my machine struggles to feed faux fur?
Stop and check the real layer stack, verified needle and foot setup, presser-foot state, and model-specific instructions. Do not pull the fabric through or change tension at random. Repeated deflection, hard resistance, or abnormal strain belongs to troubleshooting or service.
References and Sources
This article uses material-specific references because long faux fur has handling concerns that are not well supported by generic fabric advice. BERNINA WeAllSew documents wrong-side marking and loose-fiber handling in a dedicated faux fur tutorial. Melly Sews separately documents nap direction, single-layer layout, backing-side tracing, and seam pile control. These sources support the material workflow without making their preferred settings or accessories universal.
Exact needle, foot, and machine choices remain model-specific, so those recommendations are deliberately not copied from either tutorial. Community discussions were reviewed for recurring beginner problems such as reversed nap, shedding, and trapped pile, but they are not used as technical proof. Two published references are enough to support the handling claims used here. Keeping the list short also avoids adding external links that do not establish a claim in the article.
- BERNINA WeAllSew faux fur tutorial: supports wrong-side marking, pile handling, and loose-fiber cleanup.
- Melly Sews faux fur tutorial: supports nap mapping, single-layer layout, backing-side tracing, trapped-pile handling, and light post-seam pile combing.
Both references are limited to the claims they directly support. They are not used to establish compatibility for an unnamed machine or to support internal repair instructions. Project-specific construction remains outside this article’s scope. That keeps the evidence aligned with the exact material decisions discussed above.