A built-in sewing speed controller changes how much speed the machine makes available, while the foot controller or Start/Stop control determines how that available speed is used. The practical job is to identify the control your exact machine provides, set it within the documented range, and learn how that setting changes the machine’s response before returning to the project. This article stays with normal operation of an existing, functioning speed control and does not cover replacement pedals, motor changes, electrical work, or a machine that behaves abnormally.
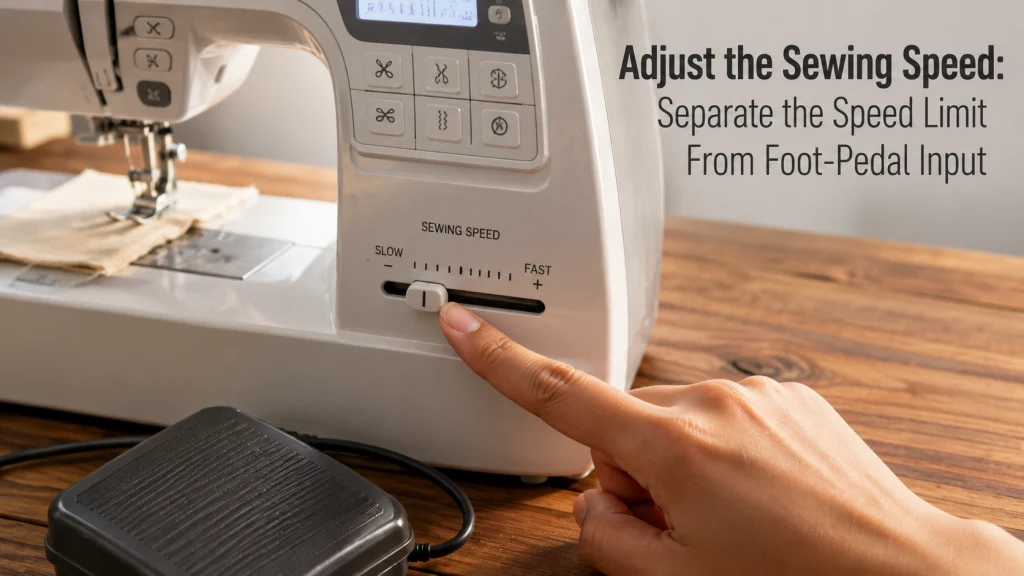
The speed limit and the pedal command are not the same thing
To adjust the sewing speed on a machine with a documented speed controller, first separate the machine’s available speed from the input that tells it to run. On supported machines, a slider, lever, or menu setting can act as a ceiling, while the foot controller changes the actual sewing speed up to that ceiling. That distinction matters because pushing the pedal farther does not necessarily override a lower maximum-speed setting.
A first-time owner can easily treat the slider and pedal as duplicate controls because both appear to make the machine run slower or faster. They are better understood as two layers of control: one establishes the permitted range, and the other operates within it. If you are still learning the relationship among basic controls, stitch selection, threading, and normal machine operation, the broader article on how to use a sewing machine provides the larger operating context without turning this speed adjustment into a repair procedure.
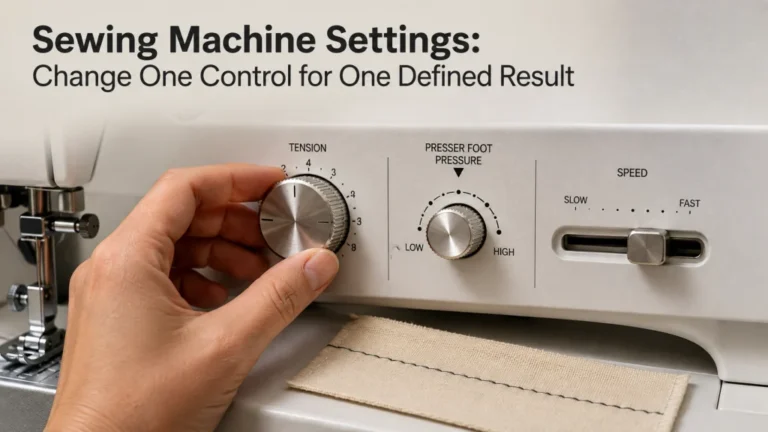
Speed-control map: Built-in speed setting → available speed ceiling; foot pedal or supported Start/Stop input → actual machine motion within that available range. The exact manual decides whether this relationship applies to your model.
| Control | What it changes | What it does not prove |
|---|---|---|
| Built-in speed slider, lever, or documented limiter | Sets or limits the speed the machine makes available, according to the exact model documentation | It does not prove how smoothly a particular pedal will modulate or how the machine will handle a given material |
| Foot controller | Commands motion and varies actual sewing speed on machines designed for pedal modulation | It does not necessarily cancel the machine’s lower maximum-speed setting |
| Start/Stop control | Starts or stops sewing on machines and modes that support button operation | It does not mean every model uses the built-in speed controller in exactly the same way |
The useful mental model is simple: think of the built-in setting as the available range and the operating control as the command inside that range. From there, the rest of the adjustment becomes a model-checking exercise rather than a hunt for one universal speed setting.
Confirm that the machine has a documented sewing-speed controller
Do not assume every slider, button, or menu item near the needle area controls maximum sewing speed. The exact manual or manufacturer support page should identify the control by function and explain whether it affects foot-controller operation, Start/Stop operation, or both. A built-in sewing machine speed control may appear as a slider, lever, dial, or screen setting depending on the exact model, so appearance alone is weak evidence.
Before changing anything, locate the exact model number and find the operating instructions for that model. Look for terms such as sewing speed controller, speed control slider, sewing speed, maximum sewing speed, or a clearly labeled speed setting. If the manual does not document such a control, do not borrow instructions from a visually similar machine and assume they transfer.
Key point: This article applies only when the machine already has a manufacturer-documented speed control and the machine is otherwise operating normally. If the feature is absent, damaged, inconsistent, or not described for the exact model, the next step is not to improvise a substitute control.
- Verify the exact machine model.
- Find the model’s operating manual or official support instructions.
- Identify the control by its documented function, not by shape alone.
- Check whether the instructions mention the foot controller, Start/Stop operation, or both.
- Keep replacement parts and electrical changes outside a normal settings adjustment.
This ownership gate prevents a common mistake: treating a missing feature as though it were simply hidden somewhere on the machine. Once the documentation confirms that speed limiting is built in, you can identify how that specific interface is meant to be used.
Identify the exact slider, lever, or menu control
A physical speed control slider usually communicates direction rather than an absolute sewing rate. Some machines expose the same kind of owner-level decision through a lever or dial, while others place it on a screen or in a menu. That interface difference does not tell you, by itself, how the underlying control behaves, so the exact model documentation still determines what the indicators mean.
For example, if your machine has a left-to-right slider that the manual identifies as the sewing-speed controller, moving it toward the slower end changes the available range. That does not mean “halfway” equals a universal half-speed value across machines. Likewise, a screen level should not be converted into a percentage or sewing rate unless the manufacturer actually defines that relationship.
Note: Brother’s support instructions for machines covered by its speed-control guidance describe moving the sewing speed controller toward the slower or faster end and state that the selected setting becomes the foot controller’s maximum sewing speed. That is a documented relationship for the supported machines, not a rule to impose on every sewing machine.
The distinction between interface and function keeps sewing speed control practical. You are not trying to decode hidden electronics; you are identifying the user control the manufacturer expects the owner to operate.
Separate the maximum-speed setting from foot-pedal pressure
On a machine where the manual links the built-in controller to the foot controller, pedal pressure works inside the maximum allowed by the machine’s setting. Pressing farther can increase the actual sewing speed, while easing pressure can reduce it, but the lower ceiling remains relevant. This is why two pedal presses that feel similar can produce different top speeds after you move the built-in control.
Keep the built-in setting unchanged while you compare light and firmer pedal pressure. Then change only the built-in limit and repeat the same foot input. That isolates the relationship between the ceiling and your pedal command without turning the exercise into a search for one supposedly correct sewing speed.
Fabric, stitch selection, technique, machine design, and the task in front of you can all change how much usable speed feels appropriate. The next section turns that distinction into a controlled practice step so the speed setting is the only variable you are deliberately changing.
Separate speed limiting from Start/Stop operation
Button-controlled sewing adds another layer because Start/Stop is an operating input, not automatically a separate speed architecture. On machines that document the built-in controller for button operation, the same slider or setting may determine the available sewing speed while the button handles starting and stopping. On other models or modes, the interaction can differ, so the manual remains the authority.
Brother’s NS80e support documentation provides a useful boundary example: it explains foot-controller operation and notes that connecting the foot controller changes the availability of the Start/Stop button. That tells the owner something specific about that machine’s control logic without proving that every computerized machine behaves the same way. The example is valuable because it shows why “the machine has Start/Stop” is not enough information by itself.
If you normally sew with a button rather than a pedal, use the operating instructions for that mode before changing the speed setting. The correct question is not which control is more advanced; it is which input the exact machine allows in the current configuration and how the documented speed controller interacts with it.
Adjust the supported speed control on a practice sample
Once the interface is confirmed, make the adjustment on scrap before using it in a section of the project where a sudden change in machine response would be inconvenient. Use the same general fabric type and a normal stitch that the machine handles correctly. The goal is to feel how the control changes available speed, not to test the limits of the machine or prove a material-capacity claim.
Start from a conservative position within the machine’s documented range and make one change at a time. With pedal operation, compare light pressure and firmer pressure while leaving the speed limit unchanged, then change the limit and repeat the comparison. With supported Start/Stop operation, keep the stitch and sample the same while changing only the documented speed setting.
Pro Tips: Keep the sample simple enough that you can pay attention to the machine response instead of fighting the fabric. A folded scrap, bulky intersection, slippery stack, or difficult curve may be useful later for project practice, but it is a poor first sample for learning what the speed control itself changes.
This approach also separates a control lesson from a sewing-quality judgment. A slower available speed may help you place stitches more deliberately on a curve, near a corner, or through another section where you want more time to guide the work, while a long straight run may not need the same ceiling. Those are task-specific operating choices, not proof that one setting fixes feeding, tension, needle, thread, or stitch problems.

PEASUG Muslin Fabric is an unbleached 100% cotton fabric supplied in a 63-inch by 2-yard cut. The material has a smooth, soft surface and is described for sewing, embroidery, garments, and craft projects. It can be machine washed or hand washed, with low-temperature washing and natural drying recommended for care.
Check On AmazonIf you click this link and buy, we earn a commission at no additional cost to you.
Change the control only within its documented range
A normal sewing speed adjustment should stay entirely within the user controls described by the manufacturer. If the machine provides a slider, lever, or menu level, use that interface as designed. Do not open a pedal, alter resistors, change motor wiring, defeat a stop, or modify an electrical control in an attempt to create a different speed range.
This boundary matters because a built-in limiter is an operating feature, while changing electrical hardware is a different task with different compatibility and safety questions. If the available range does not meet your needs, that does not make internal modification an extension of this procedure. It means the normal owner-level adjustment has reached its documented limit.
Warning: Stop using the machine if you notice a damaged cord, overheating, smoke, a burning odor, sparks, uncontrolled motion, or another electrical or mechanical condition that the manual reserves for service. A speed-setting article is not a substitute for diagnosis or qualified service.
Keeping the change inside the documented interface also preserves a clear cause-and-effect relationship. You know which supported control changed, and you have not introduced an undocumented variable into the machine.
Record a task-specific setting when it is useful
You do not need a permanent speed setting for every kind of sewing, but a small note can help when a recurring task benefits from a familiar control position. Record the indicator the machine actually provides, such as a screen level, labeled mark, slider position, or other documented reference. Avoid converting that position into a made-up percentage or stitches-per-minute figure.
For example, you might note that a curved topstitching section felt easier to control with the slider near a certain labeled position, while a long straight seam used more of the available range. That is a personal operating reference for your machine and task, not a universal recommendation. If the fabric, stitch, presser foot, thread, or technique changes, reassess rather than treating the old note as a fixed rule.
Recording the setting is most useful when it helps you reproduce a known starting point. It should never replace the manual or become evidence that one speed is objectively best for a beginner, a fabric, or a sewing technique.

The Dritz Dual Purpose Marking Pen combines a blue Mark-B-Gone tip with a purple disappearing-ink tip. The blue ink is water soluble, while the purple ink can disappear through air exposure or be removed with water. Dritz lists the pen for temporary fabric markings used in sewing, quilting, needlecraft, seam allowances, and other marked sewing details.
Check On AmazonIf you click this link and buy, we earn a commission at no additional cost to you.
Do not turn a normal adjustment into a machine-shopping question
This procedure assumes the speed-control feature already exists on a functioning machine. Questions such as which machines include a slider, whether a computerized model offers finer control, or which machine is best for a particular project are purchase decisions, not normal settings guidance. Mixing those intents makes it harder to tell whether the reader needs an operating instruction or a different machine.
The same boundary protects against unsupported performance claims. A machine having a speed limiter does not prove that it feeds difficult materials better, produces better stitches, or gives a new sewist better results. Those outcomes depend on more than the presence of one control, including the machine, material stack, needle, thread, presser foot, feed behavior, stitch, and the operator’s technique.
If you already own the machine, work with the control it actually provides before comparing feature lists elsewhere. That keeps the immediate task narrow: understand the existing setting, test its effect, and decide whether the documented range suits the work in front of you.
Treat replacement pedals as a separate compatibility question
A foot controller that is missing, damaged, intermittent, or incompatible is not the same problem as adjusting an existing speed limiter. Replacement pedals can depend on the exact machine model, connector, electrical specification, manufacturer part information, and other compatibility evidence. Visual similarity is not enough to establish fit or safe operation.
Do not use a generic pedal recommendation as a shortcut when the original control is not working correctly. The correct replacement path starts with the exact machine documentation and manufacturer-supported part information, not with changing the built-in speed setting. This article intentionally stops before replacement selection because the evidence required is different.
A common misunderstanding is to assume that a jumpy or unresponsive pedal can be “fixed” by moving the speed slider. A lower ceiling may change the maximum available speed on a supported machine, but it does not diagnose why the pedal behaves abnormally. That symptom belongs on a fault path, not in a normal operation procedure.
Stop if the machine surges, ignores the setting, or behaves abnormally
Normal adjustment assumes predictable response: the control changes the available speed in the way the manual describes, and the operating input remains controllable. If the machine surges, races unexpectedly, ignores the setting, starts or stops unpredictably, or the controller feels electrically or mechanically abnormal, stop treating the issue as a settings exercise. Repeating the same adjustment is not a substitute for identifying a fault.
Return to the exact manual and manufacturer support information, then follow the service boundary for that model. Do not open the controller, modify the pedal, alter the motor circuit, or bypass a safety feature. If the documentation directs the owner to service, use qualified service rather than extending a normal adjustment into internal repair.
| Situation | Right next step |
|---|---|
| The documented slider or limiter works normally | Adjust it within the supported range and verify the result on scrap |
| You are comparing machines because yours lacks the feature | Treat that as a separate buying decision rather than an operating adjustment |
| The pedal is missing or needs replacement | Verify exact model compatibility and supported replacement information |
| The machine surges, ignores the setting, or behaves unpredictably | Stop the normal-use procedure and move to model-specific troubleshooting or service |
The boundary is intentionally conservative because speed control sits next to electrical and motion systems that are not appropriate for guesswork. A functioning control belongs in normal use; abnormal behavior belongs in troubleshooting and service.
Check the next setting only when the symptom points there
Speed and fabric feeding are related during sewing, but the controls are not interchangeable. If the machine responds correctly to the speed controller yet the fabric is not advancing as expected, do not keep moving the speed limit in search of a feed fix. The feed system, presser-foot state, stitch settings, needle and thread, material condition, or a fault may be the more relevant path.
If your normal-use question is specifically whether the machine’s feed dogs are engaged or lowered, continue with the instructions on how to raise or lower the feed dogs. For other supported operating controls, the overview of understanding sewing machine settings keeps those adjustments in their proper context.
This routing prevents one control from becoming the explanation for every sewing symptom. Adjust speed when speed is the setting you intend to change, and move to another control only when the machine’s documented behavior and the actual symptom point there.
Final Thoughts: adjust the control the machine already provides
The cleanest way to adjust sewing speed is to use the exact control the manufacturer documents for your machine and understand what that control actually limits. On supported machines, the built-in setting can establish the available speed while the pedal or Start/Stop input determines how the machine operates within that system. That separation makes the control easier to learn without inventing a universal percentage, speed target, or performance promise.
Verify the interface, practice on scrap, change one variable at a time, and keep a task-specific note only if it helps you return to a useful starting point. If the machine behaves abnormally or the question has shifted to replacement parts, buying, electrical work, or fault diagnosis, stop treating it as a normal setting adjustment. The useful next move is always the one supported by the exact machine and the condition in front of you.
Frequently Asked Questions
🎚️ What does the speed control slider do on a sewing machine?
On machines that document it as a speed limiter, the slider changes the available or maximum sewing speed. Check the exact manual because the relationship with the foot controller or Start/Stop operation can vary by model.
🦶 Does pressing the foot pedal harder override the speed limiter?
Not on machines where the built-in controller sets the foot controller’s maximum sewing speed. Pedal pressure changes actual speed within the available range, so a lower ceiling can remain in effect even with firmer pedal pressure.
▶️ Can I use the speed control without the foot pedal?
Some machines support speed adjustment with Start/Stop operation, but the exact interaction is model-specific. Use the operating instructions for your machine rather than assuming button-controlled models all work the same way.
🧵 What sewing speed should a beginner use?
There is no universal setting that fits every beginner, machine, stitch, and material. Start within the documented range at a speed you can control on scrap, then change it based on the task and the response of the exact machine.
⚠️ Why does my machine suddenly speed up even with a low setting?
Unexpected surging or a machine that ignores its documented setting is no longer a normal adjustment question. Stop using the normal-use procedure, check the exact manual and support information, and use qualified service when the manufacturer reserves the issue for service.
These answers all depend on the same distinction: a normal, documented control can be adjusted by the owner, while abnormal behavior, replacement compatibility, and internal electrical work require a different path. Keeping those boundaries separate makes the speed setting easier to understand and safer to apply.
References and Sources
- Brother sewing speed support: Verifies how Brother describes the speed controller and its relationship to maximum foot-controller speed on supported machines.
- Brother NS80e foot controller support: Verifies model-specific interaction among the foot controller, maximum sewing speed setting, and Start/Stop operation.