Bobbin insertion starts with identifying the lower-thread housing on the exact machine, because a top-drop-in system and a front-load removable-case system do not use one universal orientation or thread path. A correctly wound, compatibility-verified bobbin still has to be placed in the documented direction, guided through the correct slot or spring, and seated without forcing the cover or case. Current SINGER and Brother instructions show why the manual matters: even common domestic systems can use different loading directions and different steps after the bobbin is seated. The goal is to finish normal lower-thread setup without drifting into fit questions, tension adjustment, or fault diagnosis.
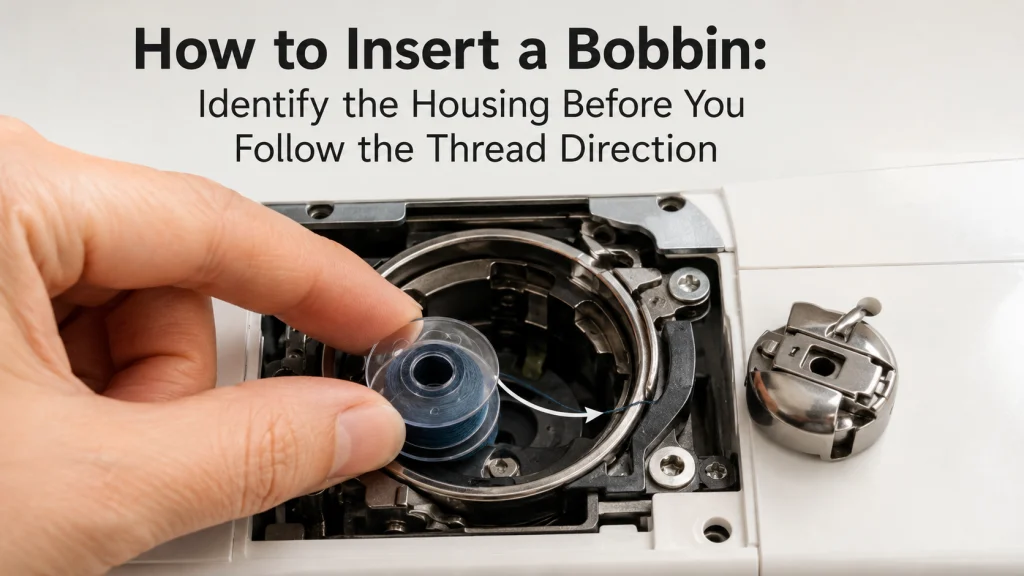
Identify the housing before you follow the thread direction
When inserting a bobbin, do not begin with a remembered rule about clockwise or counterclockwise thread. Begin by looking at the exact machine and identifying how its lower-thread area is built. A bobbin that drops into a compartment under a top cover is handled differently from a bobbin that first goes into a removable case behind a front access area, and another machine may use a documented arrangement that does not match either simplified picture.
This is also why a generic tutorial can become misleading even when each individual step looks familiar. Current SINGER support separates top drop-in and front-load instructions rather than presenting one direction for both systems. If you need the larger threading sequence around this task, thread a sewing machine in the correct sequence first, then return to the lower-thread housing with the exact manual beside you.
| What you see | Likely setup branch | What to verify before proceeding |
|---|---|---|
| Bobbin compartment opens from the top of the machine bed | Top-drop-in style | Exact unwind direction, slot path, cutter or tail instructions, and cover replacement |
| Hinged or removable access opens at the front, with a removable bobbin case | Front-load removable-case style | Bobbin direction inside the case, thread path under the case spring or finger, and how the case seats in the shuttle |
| Housing does not clearly match either description | Another documented system | Stop using generic instructions and identify the exact model manual before loading |
The table is an identification aid, not a compatibility test. It assumes the bobbin and any removable case are already known to fit the machine. If that has not been verified, the correct next step is not to force the part into whichever opening looks closest.
Confirm the bobbin and case are already compatibility-verified
This setup begins after fit has been established. A bobbin can have the right general shape and still be the wrong class, height, material, or specification for the machine, and a removable case that looks similar can still be wrong for the lower-thread system. Visual similarity is not enough evidence to turn an unknown part into a setup problem.
Use the exact model manual, manufacturer parts information, or a current compatibility listing that names the machine and component before attempting normal bobbin insertion. Once fit is confirmed, this article can help with orientation and seating. If fit is uncertain, keep compatibility as a separate question rather than trying to solve it by pushing the bobbin or case into place.
Identify top-drop-in, front-load, or another documented system
A top-drop-in system normally exposes the bobbin area through a cover in the machine bed, so the bobbin is placed directly into the visible holder. A front-load system typically adds another step: the bobbin is placed into a removable case, then that case is installed into the machine’s shuttle area. Those descriptions are useful for finding the correct branch, but they are not a promise that every machine within a branch uses the same thread direction.
SINGER’s current support pages make the difference concrete. Its top-drop-in instructions specify one unwind direction, while its front-load instructions specify the opposite direction inside the removable case. That contrast is the evidence to remember, not either direction by itself: the housing and exact documentation determine the loading path.

Brother SA156 Clear Plastic Bobbins are genuine Brother 7/16-inch-deep bobbins sold in a 10-pack. Their clear plastic design makes remaining thread visible, and a security notch supports consistent bobbin winding. Use them only when the exact Brother machine is listed as compatible with SA156 bobbins.
Check On AmazonIf you click this link and buy, we earn a commission at no additional cost to you.
Put the needle area in the manual-required state
Before opening the bobbin area, check the manual for the required needle position, presser-foot position, and power state. Manufacturer instructions commonly call for the needle to be raised before loading, but the safety wording and controls are model-specific. Brother’s current bobbin-installation support, for example, explicitly instructs the user to turn the machine off as part of the procedure.
Do not improvise around the needle simply because the machine appears idle. If the exact manual requires the machine to be switched off for lower-thread setup, do that before placing fingers near the needle plate or bobbin area. For broader owner-level setup and operating boundaries, use a sewing machine safely and correctly as the wider reference.
Open the cover or remove the case without forcing it
On a top-drop-in machine, the manual may direct you to slide a release or lift a bobbin cover before the bobbin is placed in the holder. On a front-load machine, the access sequence may involve opening a hinged cover and using the bobbin-case latch to remove the case. The important setup behavior is controlled access: use the release, latch, or cover motion the manufacturer documents rather than prying at a part that does not move freely.
A first-time owner can easily mistake resistance for a part that simply needs more pressure. That is not a safe assumption around a bobbin case or cover. If the documented release has been used and the component still will not come out or go back into position normally, stop the insertion process rather than escalating force.
Insert the bobbin in the exact documented unwind direction
How to insert a bobbin correctly depends on how thread is meant to leave that bobbin inside the specific housing. The manual may show an arrow, a thread-tail position, or a visual diagram rather than relying on the words clockwise and counterclockwise alone. Match that diagram to the machine in front of you, especially if you learned on a different bobbin system.
Two current SINGER support pages show why this matters. The company’s top-drop-in instructions tell the user to place the bobbin so it turns counterclockwise as thread is pulled, while its front-load instructions tell the user to put the bobbin into the removable case with thread running clockwise. Those instructions are valid for the systems covered by those support pages, but they are not a universal rule for every top-loader or every front-loader.
Key point: Treat the direction shown in the exact manual as the instruction. Treat clockwise or counterclockwise advice from another machine as an example only.
That distinction prevents a common setup shortcut from becoming a wrong-machine instruction. If the manual uses a picture instead of a direction word, follow the picture and the documented thread path rather than translating it into a rule you plan to reuse everywhere.
Route the thread through the documented slot or spring
Placing the bobbin in the housing is only part of the job. The lower thread still has to enter the path that controls how it leaves the bobbin. In a top-drop-in arrangement, that can mean drawing the thread through one or more molded or metal slots in the holder area. In a removable case, it can mean guiding the thread through the case slit and under the documented spring or finger.
Brother’s current installation support specifically warns that the thread needs to enter the bobbin-case tension spring correctly on the covered machines. That is a threading-path instruction, not an invitation to change the spring or turn a bobbin-tension screw. The setup task is to place the thread where the manual shows it, then leave adjustments alone unless a separate model-specific procedure explicitly calls for them.
| Exact-manual loading check | What you are confirming |
|---|---|
| Correct housing identified | You are following instructions for the machine’s actual lower-thread layout |
| Needle area prepared as documented | Needle position, presser-foot state, and power state match the manual |
| Bobbin orientation matches the diagram | The thread leaves the bobbin in the specified direction |
| Thread enters every documented slot | The lower thread follows the intended control path |
| Thread is under the specified spring or finger when applicable | The removable case or holder is threaded as designed |
| Tail or cutter step matches the model | You are not copying a quick-set or long-tail workflow from another machine |
Run this checklist against the manual rather than memory. It is especially useful when moving between two household machines that look similar from above but use different holder, cutter, or case instructions.

This Coats & Clark Dual Duty All-Purpose Thread set includes one black spool and one white spool, with 400 yards on each spool. The thread has a polyester-covered polyester core and is intended for both hand and machine sewing. The two basic colors provide a practical general-purpose thread supply for winding compatible bobbins and everyday sewing projects.
Check On AmazonIf you click this link and buy, we earn a commission at no additional cost to you.
Seat the case or replace the cover as documented
For a removable-case system, the manual should show how the case is held, aligned, and seated in the shuttle area. SINGER’s current front-load support uses the hinged case latch during insertion. On a top-drop-in system, the closing step is more likely to involve replacing the bobbin cover in its designed tabs or slots after the thread path is complete.
Neither closing step should require improvised force. A case that will not seat in the documented position, a cover that cannot close normally, or a bobbin that visibly interferes with the housing is a stop condition, not a cue to press harder. Recheck that you are using the correct procedure for the exact machine before moving on.
Separate quick-set systems from workflows that call for raised lower thread
Finishing bobbin insertion does not always lead to the same next step. Some machines use a quick-set arrangement with a built-in thread path and cutter that prepares the lower thread for sewing without requiring the user to draw a loop up through the needle plate first. Other workflows call for a lower-thread tail to remain available so the thread can be raised before sewing or for a particular task.
Brother’s current quick-set documentation makes this boundary explicit: on covered machines, the thread can be routed through the quick-set slit and cutter, and normal sewing can begin without drawing up the bobbin thread. The same documentation also notes situations such as gathers or darts where the lower thread may be drawn up manually to leave a usable tail. That is why “always pull up the bobbin thread” and “never pull it up” are both too broad.
The correct branch comes from the machine documentation and the task, not from a habit learned on a previous machine. Once the bobbin is seated, this is the point where insertion ends and the next lower-thread step may or may not begin.
Raise the lower thread only when the machine or task calls for it
If the manual says the machine is ready to sew after the quick-set thread path is completed, do not add an unnecessary pickup step merely because another machine required one. If the manual or the intended technique calls for a lower-thread tail above the needle plate, then raising it is a separate operation with its own handwheel and thread-handling sequence.
That next operation is covered in raise the bobbin thread correctly. Keeping the steps separate matters because bobbin insertion answers “Is the lower thread installed in its housing?” while raising the thread answers “Do I need the lower thread brought above the needle plate before this machine or task proceeds?”
Stop if the case will not seat, the bobbin is damaged, or the machine is already jamming
Normal bobbin insertion should not become a repair session. If a compatibility-verified case will not seat using the documented alignment, the bobbin is chipped, warped, cracked, or otherwise damaged, or the machine is already binding or jamming, stop the setup sequence. Those conditions introduce a fit, condition, or fault question that this tutorial does not diagnose.
Do not respond by changing a bobbin-tension screw, removing the hook or race, or forcing the handwheel through a hard mechanical stop. Recheck the exact model instructions and move to symptom-led troubleshooting or qualified service when the machine is not behaving like a normal setup procedure. The purpose of this article is to establish a correctly loaded lower-thread system, not to make an abnormal mechanism behave by trial and error.
Final Thoughts: housing first, direction second
The safest way to remember bobbin insertion is not “clockwise” or “counterclockwise.” Remember the sequence instead: identify the housing, confirm the correct bobbin and case are already known, prepare the needle area as the manual requires, place the bobbin in the documented orientation, route the thread through the correct path, and close or seat the system without force.
After that, let the exact machine decide what comes next. A quick-set system may be ready to sew, while another machine or task may require you to raise the bobbin thread. If the bobbin still needs winding, return to wind a sewing machine bobbin. If the housing or case will not seat normally, stop treating it as routine insertion and move to the appropriate fit or fault question.
Frequently Asked Questions
🧵 Which way should the bobbin go in?
Follow the unwind direction shown for the exact machine. Do not apply one clockwise or counterclockwise rule to every housing, because current manufacturer instructions show different directions for different systems.
🪡 How do I put a bobbin in a sewing machine without guessing the direction?
Identify whether the machine uses a top-drop-in, front-load removable-case, or another documented system, then match the bobbin orientation to the exact manual diagram. Use the thread path and arrows in that documentation rather than memory from another machine.
📦 Do I put the bobbin directly into the machine or into a bobbin case first?
That depends on the lower-thread system. A top-drop-in design may place the bobbin directly into its holder, while a front-load design may require the bobbin to be threaded into a removable case before the case is seated in the machine.
✂️ Do I need to leave a long bobbin-thread tail after loading?
Not on every machine. Some quick-set systems route the thread through a built-in cutter and can begin normal sewing without first drawing up the lower thread, while other machines or tasks require a tail for the next step.
⬆️ Do I always have to pull the bobbin thread up before sewing?
No. Check the exact manual and the intended task. Some quick-set systems can begin sewing directly, while other workflows call for the lower thread to be raised through the needle plate.
⚙️ What should I do if the bobbin case will not click or seat into place?
Stop rather than forcing it. Recheck the exact model procedure and confirmed part fit; if a correct case still will not seat normally or the mechanism is binding, treat that as a separate fault or service question.
References and Sources
- SINGER top drop-in bobbin instructions: Confirms the documented needle position, cover removal, bobbin direction, thread-slot path, and cover replacement for the covered top-drop-in system.
- SINGER front-load bobbin instructions: Confirms the documented presser-foot and needle state, removable-case loading direction, case thread path, latch use, and shuttle insertion sequence.
- Brother bobbin installation support: Confirms power-off guidance, model-specific bobbin orientation, thread routing through the slit and tension spring, and cover replacement for the listed machines.
- Brother quick-set bobbin instructions: Confirms the quick-set slit and cutter workflow and that the covered system can begin normal sewing without first drawing up the lower thread.